Quantcast
Channel: Minecraft 1.6.2 Mods – 9Minecraft | Minecraft Mod
Viewing all 2832 articles
Browse latest View live

Torch Levers Mod [1.6.4/1.6.2]

$
0
0

http://www.img2.9minecraft.net/Mod/Torch-Levers-Mod.jpg

What Torch Levers Mod does?

The Torch Levers Mod adds several security themed blocks to the game. Whether you want to keep a room hidden by illusions and secret levers, or place deadly traps in your fortress — the Torch Levers Mod has something for you.

[[Visit blog to check out this spoiler]]

Mod Spotlight:

Recipes:

Torch Lever
Torch Levers Mod

Redstone Torch Lever
Torch Levers Mod

Book Button
Torch Levers Mod

Brick Button
Torch Levers Mod

Netherbrick Button
Torch Levers Mod

Torch Button
Torch Levers Mod

Redstone Torch Button
Torch Levers Mod

Redstone Lever
Torch Levers Mod

Redstone Button
Torch Levers Mod

Hinged Painting
Torch Levers Mod

Carpet Trapdoors
Torch Levers Mod

Collapsing Slabs
Torch Levers Mod

Spike Trap
Torch Levers Mod

Poison Spike Trap
Torch Levers Mod

Slowing Spike Trap
Torch Levers Mod

Blinding Spike Trap
Torch Levers Mod

Flaming Spike Trap
Torch Levers Mod

Withering Spike Trap
Torch Levers Mod

Automatic Spike Trap
Torch Levers Mod

Illusion Blocks (the block is not consumed)
Torch Levers Mod

How to install Torch Levers Mod for Minecraft:

  • Download and install Minecraft Forge
  • Download Torch Levers Mod
  • Drag and drop the downloaded jar file into the .minecraft/mods folder. If one does not exist you can create one
  • Done

Changelogs:

v1.3.2

  • Compatibility fixes
  • Added in game changelog

Download Links:

For 1.6.4/1.6.2

http://www.dl.9minecraft.net/index.php?act=dl&id=1385592471

http://www.dl2.9minecraft.net/index.php?act=dl&id=1385617709

Older versions:

[[Visit blog to check out this spoiler]]

The post Torch Levers Mod [1.6.4/1.6.2] appeared first on Minecraft Mods, Resource Packs, Texture Packs, Skins and more.


Thaumcraft Mod [1.6.4/1.6.2/1.5.2]

$
0
0

http://www.img.9minecraft.net/Mod/Thaumcraft-Mod.jpg

About this mod:

Thaumcraft is a mod which allows you to use the magic around you in the form of “vis” (pronounced “Veece”) to perform different tasks and create fantastic items.

Thaumaturgy… which giveth certain order to make strange works, of the sense to be perceived and of men greatly to be wondered at.

Thaumaturgy is the capability of a magician to work miracles. A practitioner of thaumaturgy is a thaumaturge, thaumaturgist or miracle worker.

This is what this mod is all about – drawing magic from physical objects in the form of Essentia and reshaping it to perform miracles.

Thaumcraft Mod Videos:

[[Visit blog to check out this spoiler]]

Thaumcraft Mod Recipes:

The first thing you will need to craft is a wand. The first one available to you is the Wand of the Apprentice crafted as shown here (using a stick and iron nuggets):

http://i.imgur.com/6z2jPqq.png

http://www.img.9minecraft.net/Mod/Thaumcraft-3-Mod-1.png

You then place a bookshelf in the world and right click on it with the wand. This gives you the Thaumonomicon which explains almost everything else you will need to know about Thaumcraft.

How to install Thaumcraft Mod for Minecraft:

  • Download and install Minecraft Forge
  • Download Thaumcraft Mod
  • Put zip file into your /.minecraft/mods folder. Do not unzip it. If you don’t have a mods folder, create one
  • Done

Adding Thaumcaft world generation to existing worlds

Yes, you heard that right. You can add all the ores, trees and other worldgen features to existing worlds by changing a few things in your config files. Remember: this could be risky so always backup your saves beforehand.

  • If this is the first time loading Thaumcraft with that save, you can leave the regen_key setting as ‘DEFAULT’ otherwise set it to anything else.
  • You need to choose what to regenerate. I strongly recommend you set aura_nodes to ‘true’ if this is the first time you are doing this. Without the aura you won’t be able to do 99.9% of the things you could in Thaumcraft.
  • Run the game. It will lag for a while and you should see some console spam about chunks being regenerated. This is fine – just wait it out. It shouldn’t take too long. If the world had been explored a lot you might see the message reappear every now and again. This is also normal.
  • If, for some reason, you wish to do this again or somehow your savefile got corrupted and your aura nodes have gone missing, all you need to do is set the regen_key value to something else. Any word would do.

IMPORTANT: If you chose to generate TC ores and such in an existing world It is best to keep the config as-is. Do not switch everything off again after running the game or server once. As you explore chunks that have been explored in the past, but you haven’t visited yet the new TC will regen in them as well. If you turn it off before you get a chance to revisit them nothing will be genererated and you will have to do the regeneration from scratch to add it to those chunks which could cause doubling of ores and nodes.

Changelogs:

v4.0.5b

  • Fixed nasty dupe bug
  • Fix for strange pech related console spam some people are getting
  • Some other small bugfixes

Thaumcraft Mod Download Links:

For 1.6.2/1.6.4

https://mega.co.nz/#!HsZwgSSC!D7hJkwNIqpkSqQBseAPpjGL6LglN99YARw7zQizw1YM

https://dl.dropboxusercontent.com/u/47135879/Thaumcraft4.0.5b.zip

http://www.files.9minecraft.net/index.php?act=dl&id=1381812925

For 1.5.2

https://mega.co.nz/#!eQ1nCC5B!AatB1UHXJnejHx6yg0YxRwZ17BN0UO2Wt3gnmao2SbM

https://dl.dropboxusercontent.com/u/47135879/Thaumcraft3.0.5i.zip

http://www.files.9minecraft.net/index.php?act=dl&id=1378785092

Older versions:

[[Visit blog to check out this spoiler]]

The post Thaumcraft Mod [1.6.4/1.6.2/1.5.2] appeared first on Minecraft Mods, Resource Packs, Texture Packs, Skins and more.

Backpacks Mod [1.6.4/1.6.2/1.5.2]

$
0
0

http://www.img.9minecraft.net/Mod/Backpacks-Mod.jpg

About Backpacks Mod:

This is a rewrite of MigthyPorks Backpack Mod. Unfortunately he no longer supports this mod. But he put all his code to the net so others can resurrect it.

This is nearly a 100% rewrite of the old mod because the old code was extremely dirty and this is a version for Minecraft Forge.

http://www.img.9minecraft.net/Mod/Backpacks-Mod-1.png

Backpacks Mod Video:

Backpacks Mod Recipes:

Normal backpacks:

You craft a backpack like a chest but with leather instead of wood. For a big backpack use tanned leather instead of normal leather.

Backpacks have 27 slots (chest size)

Big backpacks have 54 slots (double chest size)

Colored backpacks:

You can also craft a colored backpack if you put any dye in the middle:

Ender backpack (was Magic backpack before):

Last but not least you can craft an ender backpack (like magic backpack before) which is a portable ender chest which shares its content with the ender chest. You craft it with an ender chest:

Recolor backpacks:

You can recolor backpacks by using a dye or the corresponding leather:


Upgrading backpacks:

You can upgrade any backpack, except the ender backpack, to a big backpack by putting tanned leather around it:

Bound leather:

You can make bound leather with two leather in the middle outer slots and strings in all other slots:

Tanned leather:

You can burn bound leather in a furnance to get tanned leather. One coal is enough for 8 tanned leather.

How to install Backpacks Mod for Minecraft:

  • Download and install Minecraft Forge installer
  • Download Backpacks Mod
  • Put zip file into your /.minecraft/mods folder. Do not unzip it. If you don’t have a mods folder, create one
  • Done

How to use them:

  • Simple hold a backpack in your hand an right click to open it.
  • If you want to rename it sneak and right click. You can enter a new name then.

Changelogs:

v1.21.24

  • [BugFix] Fixing incompatibility with forestry
  • [BugFix] Fixed a bug in SSP where FMLServerStoppingEvent is not called
  • [BugFix] Fixed EnderBackpack not working

Backpacks Mod Download Links:

For 1.6.4

http://www.dl4.9minecraft.net/index.php?act=dl&id=1380098870

http://www.dl3.9minecraft.net/index.php?act=dl&id=1380099133

http://www.dl5.9minecraft.net/index.php?act=dl&id=1380124812

For 1.6.2/1.6.1

http://www.dl3.9minecraft.net/index.php?act=dl&id=1373290345

http://www.dl4.9minecraft.net/index.php?act=dl&id=1373290074

For 1.5.2

http://www.dl2.9minecraft.net/index.php?act=dl&id=1368085155

http://www.dl4.9minecraft.net/index.php?act=dl&id=1368060329

Older versions:

[[Visit blog to check out this spoiler]]

The post Backpacks Mod [1.6.4/1.6.2/1.5.2] appeared first on Minecraft Mods, Resource Packs, Texture Packs, Skins and more.

Material Detector Mod [1.7.2/1.6.4/1.6.2/1.5.2]

$
0
0

http://www.img.9minecraft.net/Mods/Material-Detector-Mod.jpg

About Material Detector Mod:

This mod is a a material detector. Its features are:

  • Show the surrounding material at your level/height map
  • Indicate (far or not far) a given material with a direction to dig for

The detector shows also the other materials that are in the list and not only the selected material.

Only the blocks that are 2 blocks deep or 2 blocks above are shown.

This way, while searching for iron, you can easily found coal.

The water and lava is also displayed using this mechanism in order to avoid to dig into lava directly

Warning: As it can be used to dig very easily some rare materials, it can be consider as a CHEAT.

This mod is compatible with the latest release of Mod loader or with Minecraft Forge (the one corresponding to the latest release of minecraft).

Detector in horizontal mode: (current material selected is diamond)

http://www.img.9minecraft.net/Mods/Material-Detector-Mod-1.png

In the detector screen, you can see some arrows, it will indicate the way to dig (up or down).

Two arrows mean that the material is more than 10 blocks away.

Detector in vertical mode: (used to display caves before digging straight down)

http://www.img.9minecraft.net/Mods/Material-Detector-Mod-2.png

Material Detector Mod Videos:

How to install Material Detector Mod:

For 1.7.x

  • Copy the content of the jar file in the 1.7.2.jar
  • Delete the META INF folder
  • Enjoy

For 1.6.x

  • Download and install Minecraft Forge
  • Download jar file
  • Put jar file into minecraft.jar
  • Done

Changelogs:

v3.0

Material Detector Mod Download Links:

For 1.7.2

http://www.dl4.9minecraft.net/index.php?act=dl&id=1385695009

http://www.dl3.9minecraft.net/index.php?act=dl&id=1385720785

For 1.6.4

http://www.dl2.9minecraft.net/index.php?act=dl&id=1380676366

http://www.dl.9minecraft.net/index.php?act=dl&id=1380700996

For 1.6.2

http://www.dl.9minecraft.net/index.php?act=dl&id=1373643675

For 1.5.2

http://www.dl.9minecraft.net/index.php?act=dl&id=1367867395

Older versions:

[[Visit blog to check out this spoiler]]

The post Material Detector Mod [1.7.2/1.6.4/1.6.2/1.5.2] appeared first on Minecraft Mods, Resource Packs, Texture Packs, Skins and more.

Mithril Mod [1.6.4/1.6.2/1.5.2]

$
0
0

http://www.img2.9minecraft.net/Mod/Mithril-Mod.jpg

What Mithril Mod does?

Mithril is not a fantasy metal. It was first introduced by author J. R. R. Tolkein in his book “Lord of the Rings”. Actually that book was a sequel to “The Hobbit”. In real life the author was a professor of history and linguistics. He was such a history nerd that he made other history professors look like amateurs. He was fully aware of the history of bronze. The form of bronze used in the Middle Bronze Age was copper arsenic alloy, often with copper antimony alloy added. After the Stone Age, people used copper. When all deposits of copper ore that could be reached by hand tools (pickaxe) were depleted, people looked for a new source. They found an ore that produced copper, but it had something else in it. The result was stronger, tougher, harder, and more durable than pure copper. And it didn’t corrode or tarnish. Great! So they used that. This was the beginning of bronze. The catch was smelting produced a toxic gas, so you have to smelt outdoors and stand upwind. They later discovered if you combine copper with tin, it makes bronze without the toxic gas. This was used in the Late Bronze Age. This was not a better bronze, in fact it was weaker, softer, and would tarnish. Softer means tools and weapons got dull more quickly. This was cheap crap, but smiths would not poison themselves. After generations, people forgot how to make the good quality stuff. Tools made of the old bronze were prized, this metal became “mythical”. That’s why J. R. R. Tolkein called it “Mithril”.

Today we know that type of bronze as arsenical bronze. Instead of copper/tin alloy, it’s copper/arsenic. The result is tougher, stronger, and the arsenic prevents oxidation so it never tarnishes. Copper/antimony alloy forms in the same conditions, so tends to form in the same area. Antimony makes any copper based alloy hard. With enough antimony, it becomes harder than tempered steel. And with enough alloying metal, bronze becomes very pale, almost silver in colour. This matches the description from Lord of the Rings.

Ore: copper/arsenic ore is tennantite. It has sulphur and some carbon, burned off during smelting. It’s green, the colour of a copper statue that’s been corroded by weather. Tetrahedrite is copper/antimony ore. It’s dark blue, but the colour can be altered by impurities like iron. Both ores occur in geothermal vents, so where lava and water meet. And the ores tend to form together. Antimony is more rare than arsenic, but for simplicity we’ll ignore that. Also for simplicity, ore generated in game will be pure. These have to be smelted, then alloyed together to make mithril.

Tennantite ore will generate with the same rules as iron ore. An ore of tetrahedrite always generates near tennantite, so the total number of blocks could potentially be twice as much as iron. But there’s a check, to generate there must be both lava and water near by. This makes the ore rare. Images are an attempt to match the real ore:

Mithril Mod Mithril Mod

Each ore is smelted to produce bronze: arsenical bronze, and antimonal bronze. These can be used to make armour, tools and weapons directly, but that’s a waste. Put an ingot of each on the crafting table to make a pair of twisted bronze ingots. Then smelt that to make mithril. Bronze is weaker than iron, Mithril is stronger than iron.

The colour of Mithril is taken from the image of a real bronze bell. This has 20% alloying metal (arsenic/antimony), only 80% copper. The handle is normal bronze, but the bell itself is Mithril. I used the eyedropper tool in GIMP.

Mithril Mod

The reason ancient people stopped making this type of bronze was the toxic gas, not any superior quality. So this is a major feature. Tennantite and twisted bronze contain arsenic, so when you smelt these the furnace will produce toxic gas. The gas uses the same game flow physics as water, but flows up. If you step into the gas, you will get poisoned. In real life, eating a food high in sulphur will increase the rate you urinate out arsenic. (The 4 letter word for urinate was deleted.) A formal medical study (published on PubMed) found garlic increases the rate 45%. So this mod adds garlic. Eating a clove of garlic will instantly cure poison. It was too hard to separate arsenic poisoning from any other poison, so garlic cures all poison. But unlike milk, garlic will not clear all potion effects; just poison. So if you drink a beneficial potion like strength, speed, invisibility, etc., eating garlic will leave those in effect. This alone is a reason to get this mod.

Garlic will grow wild in grass, using the same generation algorithm as pumpkin. Harvest to get a garlic bulb. “Break” the bulb on the crafting table or crafting box to get several cloves. Eat a clove to cure poison. Or plant a clove in tilled soil to farm garlic. When mature, garlic will have a purple flower. In real life you harvest garlic just before the flower forms, but I need something to indicate it’s ready to pick. So in game, pick when the flower forms.

The title image above shows a player wearing full Mithril armour, holding a Mithril sword, and standing in front of a garden of garlic.

I also added arrow heads. You can make arrows with Mithril instead of flint. It forms a normal arrow, but useful if you’re short of flint. This also works with iron, or antimonal bronze (the hard bronze), but not arsenical bronze.

Arsenical bronze is tough, but not as hard as steel. So you can craft armour with it, but not tools or weapons. Antimonal bronze without arsenic is hard, but not tough. So you can craft tools and weapons, but not armour. Mithril is harder and tougher than either alone, you can craft everything with it. This is intended.

Durability:

  • Gold – 32 uses
  • Wood – 59 uses
  • Stone – 131 uses
  • Bronze – 201 uses
  • Iron – 250 uses
  • Mithril – 401 uses
  • Diamond – 1561 uses

How to install Mithril Mod for Minecraft:

  • Download and install Minecraft Forge
  • Download the mod
  • Put zip file into your /.minecraft/mods folder. Do not unzip it. If you don’t have a mods folder, create one
  • Done

Mithril Mod Download Links:

For 1.6.4

http://www.dl3.9minecraft.net/index.php?act=dl&id=1385634290

http://www.dl5.9minecraft.net/index.php?act=dl&id=1385634627

For 1.6.2

http://www.dl5.9minecraft.net/index.php?act=dl&id=1378747840

http://www.dl3.9minecraft.net/index.php?act=dl&id=1378722215

For 1.5.2

http://www.dl.9minecraft.net/index.php?act=dl&id=1378747143

The post Mithril Mod [1.6.4/1.6.2/1.5.2] appeared first on Minecraft Mods, Resource Packs, Texture Packs, Skins and more.

Booze Mod [1.6.4/1.6.2/1.5.2]

$
0
0

http://www.img2.9minecraft.net/Mod/Booze-Mod.jpg

What Booze Mod does?

Booze Mod let’s you brew beer and wine. It introduces grape vines for wine, and hop vines for beer, and heather. Red wine, and 4 flavours of beer: “normal” beer, the style of ale prior to the 11th century, Irish stout, and Scotch beer (heather ale).

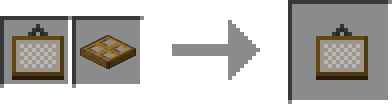
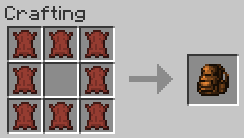
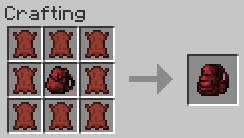
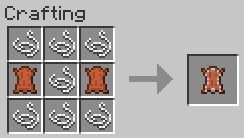
You see three new pieces of equipment: brew pot, barrel, and carboy. Central to brewing is the barrel. This is made on a crafting table, from 7 wood planks arranged in a U shape like a cauldron.

Booze Mod

The barrel has many uses. If you right-click with a bucket of water, it adds water to the barrel. The barrel can hold five buckets full. Each bucket is interpretted as one imperial gallon (160 fluid ounces). So a barrel can hold 5 imperial gallons (23 litres). If you right-click with an empty bucket, it takes one bucketful. If you right-click with anything other than a bucket, it opens a GUI window like a furnace. If a bucket is outside, rain has a random chance of adding water. Typically, a rain storm will add one bucketful.

To brew wine, start by adding 3 buckets of water to the barrel. Then open the interface and place 12 grapes in the top tile, and yeast in the bottom tile where fuel would normally go. This starts wine fermenting. This is the primary fermenter, in real life it takes a week, but in Minecraft it’s done when the progress arrow shows it’s finished. When it’s done fermenting, the barrel will hold 5 buckets of red wine. That’s because there’s 2 buckets of juice from the grapes, plus the water you started with. The GUI shows what liquid is in the barrel, and a button to transfer contents. The next step is to transfer to a carboy. In real life you pour the wine through cheese cloth, to get grape skins, pulp, and seeds out. For the transfer button to work, you must have a carboy adjacent to the barrel, one of it’s 4 sides, and place a piece of cheesecloth in the lower tile. Once transfered, the barrel will be empty and the carboy full.

Booze Mod

A carboy can hold water. Just right-click with a bucket of water to add water, or an empty bucket to remove water. But the carboy must be empty to receive wine. Once wine is in the carboy, it fermets further. Currently there is no GUI for a carboy, but it must complete fermentation before the wine will be available. Once complete, right-click with a stack of 64 empty glass bottles. All bottles will fill with red wine, emptying the carboy. Or right-click with 13 glass bottles to remove one gallon at a time. Note: if you fill 13 bottles at a time, you will end up with 65 bottles, one extra. This demonstrates the extra care you made to not waste any. Each glass bottle is the size of a beer bottle; in the US that’s 355ml (12oz), or in Canada 341ml (11.5oz). So one carboy could fill 64 US beer bottles, or 66 Canadian beer bottles.

A carboy is also made on the crafting table. It takes 7 blocks of glass, in the same arrangement as a barrel.

Some people may be tempted to jump into the barrel and “stomp” the grapes. This isn’t necessary, fermentation is a progress bar. Besides, I make wine from grapes I grow in my back yard. I use a potato masher that’s been carefully cleaned and sterilized. But you can jump in if you want to. If you wear leather boots and jump into a barrel full of wine, your boots will be stained purple. Nothing else will get stained. And a barrel can be used to wash off die or stain. Fill the barrel with water, hold any coloured leather armour, and right-click the barrel. It will wash off the colour.

Making beer is a more involved process. The basic steps are: sprout, roast, boil, ferment. Beer is usually made from barley, but barley was developed in the same place and time as wheat. Both were from harvesting seeds from tall grass. Rather than have 2 wheat-like crops, this mod just uses wheat. Grain has a lot of starch, the first 3 steps are to break up starch into sugar. Yeast eats sugar to produce alcohol. Start by filling the barrel with 3 buckets of water. Then right-click the barrel, and place 24 wheat in the top tile. As long as the other tiles are empty, the progress bar will start moving right away. This soaks the grain, in real life it takes 3 days and the grain swells. All 24 wheat move to the output tile in one step. If you put more than 24 in the top tile, the remainder will stay behind. If you put 48 or more in the top tile, the progress bar will start again, soaking another 24 wheat. The output is 24 wet grain.

Sprouting: In real life this is done by spreading it out on a wooden floor. To simulate this you have to “plant” the wet gain on wooden planks. One unit of wet grain on each block of wood plank. The wet grain will “grow”, using the same texture as wheat. After 14 game days it will become sprouts. You can tell when there’s orange at the base of the sprouts. Harvest to get sprouts. The title image above shows a wooden floor with sprouts; the ones on the right have the orange base. Sprouts don’t care about light: day or night, outdoors or in a cave, they take the same time.

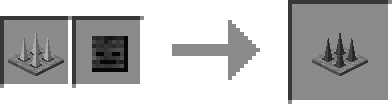
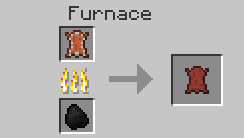
Roasting: Place sprouts in a furnace to roast them. A normal furnace, so they roast one at a time. They will become malted grain. If you want to make Irish stout, put the malted grain back in the furnace and roast a second time; it’ll become dark malted grain.

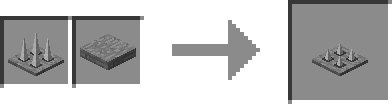
Mashing: A commercial brewery does this in a “mashing tun”, which is just a big barrel. Soak the malted grain in hot water. Minecraft doesn’t have temperature of water, so again put 3 buckets of water in the barrel, then place the 24 malted grain in the top tile. When the progress bar is complete the barrel contents will change from water to “Sweet Wort”. If you used dark malted grain it will be “Sweet Dark Wort”. Next transfer to a brew pot.

Sparging: A commercial brewery uses a “lauter tun”, which is a special barrel with a sieve in the bottom. After draining, scoop up any particulate matter and pour it back into the lauter tun. Keep doing this until the sweet wort is clear. This game mod just uses another piece of cheesecloth. Place cheesecloth in the bottom tile, and press the transfer button. The button will only work if a brew pot is adjacent and empty.

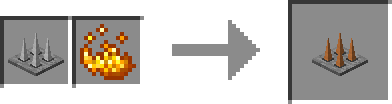
Boiling: The brew pot requires fuel. Once your sweet wort is in the brew pot, right-click to open the GUI and place fuel in the bottom tile. The bottom part of the brew pot will burn like a furnace while fuel is burning. Before it will boil, you must add a “bittering agent” to the top tile. To make beer, add 2 hops. For ale, add 4 dandelion (yellow flowers). Irish stout requires Sweet Dark Wort, but it also uses 2 hops. For Scotch beer (aka heather ale), use normal Sweet Wort and place 2 heather in the top tile. Once the progress bar is finished, Sweet Wort will become Wort. In real life you have to add 4 gallons of water before boiling, for a total of 7 gallons. It will boil down to 5 gallons. I may add that later, but for now the brew pot is either full or empty. Transfer your Wort to the barrel with the transfer button.

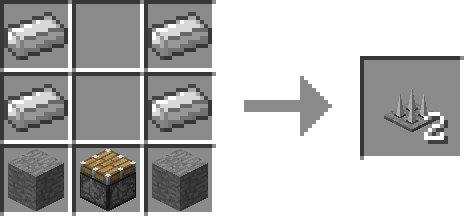
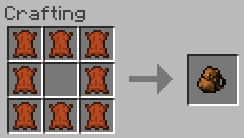
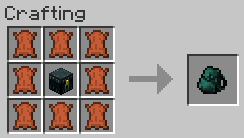
Making a brew pot: again on the crafting table. This requires 5 ingots of iron and 2 blocks of cobblestone.

Booze Mod

Fermenting: Next you ferment your wort. Right-click the barrel and place yeast in the bottom tile. The yeast will be consumed and it will start fermenting right away. Once the progress bar is finished, your wort will be beer. But you’re not finished. Next transfer to the carboy for the last step of fermentation. This time you do not require cheesecloth. You did that when you transferred to the brew pot.

Second fermentation: Once in the carboy it will also progress before being finished beer. Once finished, again take 64 glass bottles and right-click the carboy. Or 13 glass bottles at a time for 65 bottles of beer.

In real life primary fermentation (in the barrel) takes 1 week, and secondary fermentation (in the carboy) takes 3 weeks for beer or 3 months for wine. In game it’s a lot faster, it’s a normal progress bar that takes the same time as a furnace. Perhaps I’ll slow it down later, but for now it’s quick.

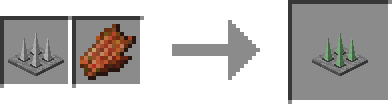
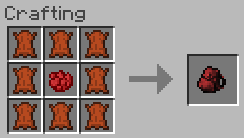
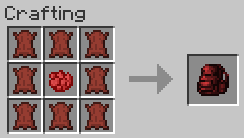
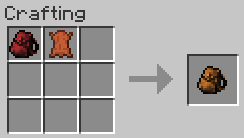
Grape vines: Ok, so you want to set up a vinyard (wine making yard). So how do you get the grapes? They grow on vines, but not just any vines. Grapes grow on grape vines. Once the mod is installed, they will generate on grass where there’s a solid block beside to climb. Grape vines do not grow the same way as vanilla Minecraft vines. Take a grape (image is a bunch of grapes), and plant in tilled soil. You can’t harvest or place the vines themselves. Once planted, grape vines will grow if there’s light, and only 3 blocks above the block you planted, (max 4 high) They can grow up to 6 blocks horizontally, so the block you planted plus 6 on either side. One plant can cover a wall, all starting from a single block of tilled soil. Each block of grape vine will produce one grape (one bunch of grapes). Right-click with shears to harvest the grape, but leave the vine. The grape will grow back as long as the vine stays. Grapes grow faster than vines spread, so be patient. You can climb grape vines just like Minecraft vines (are those ivy?). And grape vines can hang down, but not very far.

Booze Mod

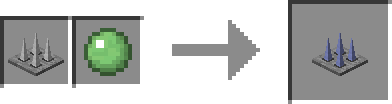
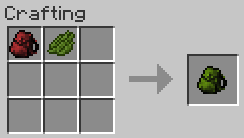
Hop vines: These are different again. They also generate on grass, but require a solid block to climb. But hop vines do not spread horizontally. They will only grow straight up. They will grow up to 7 blocks high. They grow faster, but they’re more picky. They use the same algorithm for soil as planted crops (wheat, potato, carrots). They grow fastest if they’re planted in wet, tilled soil. And if all 8 blocks surrounding their soil is also tilled soil. But unlike other crops, they don’t care if they’re in rows or not. After all, they require a vertical surface to climb anyway. All blocks of hop vine will check the soil at the bottom to determine growth rate. Vines (grape or hop) do require light level 9 or higher to grow. Real life hop vines die over winter, but roots are perennial. Vines re-grow every year. To simulate this, when you harvest a hop, that block of vine is destroyed. A tip for farmers: don’t harvest the bottom block. Leave it to re-grow. Since Minecraft doesn’t have roots, if you harvest the bottom block you’ll have to re-plant. Since each block produces just one hop, the hop you harvest would just have to be planted anyway. While you can plant just a single grape, it will eventually cover a wall, you can plant a row of hops along the base of a wall.

Booze Mod

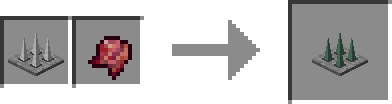
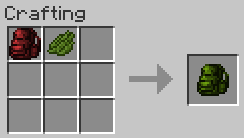
And finally heather. This will only generate in Extreme Hills biome. You can harvest and plant just like a potato or carrot.

Booze Mod

Yea Ok. Most real heather ale recipes are more involved. They include common heather, but also yarrow, honey, and often lavender and sweet gale, and crushed crystal malt. That last one is malted grain that has been heat treated to turn the sugar into crystals of a type that yeast cannot metabolize. That means the sugar remains in the beverage when it’s ready to drink. But all that’s too complicated. The primary purpose for a bittering agent is preservative. Hops do that, as well as dandelion and heather. So let’s keep to the essentials.

How to install Booze Mod for Minecraft:

  • Download and install Minecraft Forge
  • Download the mod
  • Put zip file into your /.minecraft/mods folder. Do not unzip it. If you don’t have a mods folder, create one
  • Done

Mod Download Links:

For 1.6.4

http://www.dl.9minecraft.net/index.php?act=dl&id=1385583582

For 1.6.2

http://www.dl.9minecraft.net/index.php?act=dl&id=1378743787

http://www.dl5.9minecraft.net/index.php?act=dl&id=1378744476

For 1.5.2

http://www.dl.9minecraft.net/index.php?act=dl&id=1378743877

The post Booze Mod [1.6.4/1.6.2/1.5.2] appeared first on Minecraft Mods, Resource Packs, Texture Packs, Skins and more.

Kitchens Mod [1.6.4/1.6.2/1.5.2]

$
0
0

http://www.img.9minecraft.net/Mod/Kitchens-Mod.jpg

What Kitchens mod does?

This mod also adds rock salt. It will generate as a large deposit that is only 1 block high, and only in rock in an ocean biome. That’s because in real life it occurs when a salt sea completely dries up. Often a lake or sea will re-form over that spot. For example, beneath the Great Lakes of North America, or beneath the Mediterranean Sea. Rock salt cannot be used directly. There will be an update that allows you to dissolve, then boil dry to convert rock salt into normal table salt. You have to get the metals and dirt and crap out before eating it.

How to use:

To start with, it has cupboards. They work like a chest, but open from the front instead of the top. That means you can stack them against a wall all the way to the ceiling. Crafting recipe is 8 wooden planks, just like a chest, but instead of leaving the centre space empty, leave the top middle empty. If you place two cupboards side-by-side, they combine to form a double cupboard. Just like a chest. You can’t place more than two cupboards beside each other, that would confuse which is combined.

Trapped cupboards work just like a trapped chest. But while a trapped chest has a bit of red colour around the latch, a trapped cupboard uses exactly the same texture as a regular chest. Similar crafting recipe: one cupboard plus one tripwire.

The mod also has countertops. It has the same GUI has a crafting table. If you right-click, it works exactly the same as a crafting table. But it’s a 1/8 height slab. You craft it with 4 slabs, but all slabs have to be the same type. For example: 4 oak slabs, or 4 spruce slabs, or 4 stone slabs. The reason they have to be the same is the countertop will be the same material as the slabs. It even has the same texture, but with the grid of a crafting table applied to it. Yes, it does work with netherbrick and quartz slabs.

So if you’re playing in creative mode and want a realistic kitchen in your house, cupboards and countertops will make it pretty.

Screenshots:

http://www.img.9minecraft.net/Mod/Kitchens-Mod-1.jpg

http://www.img.9minecraft.net/Mod/Kitchens-Mod-2.jpg

http://www.img.9minecraft.net/Mod/Kitchens-Mod-3.jpg

http://www.img.9minecraft.net/Mod/Kitchens-Mod-4.jpg

How to install Kitchens Mod for Minecraft:

  • Download and install Minecraft Forge installer
  • Download Kitchens Mod
  • Put zip file into your /.minecraft/mods folder. Do not unzip it. If you don’t have a mods folder, create one
  • Done

Download Kitchens Mod:

For 1.6.4

http://www.dl.9minecraft.net/index.php?act=dl&id=1385595000

http://www.dl2.9minecraft.net/index.php?act=dl&id=1385620237

For 1.6.2

http://www.dl4.9minecraft.net/index.php?act=dl&id=1379404557

http://www.dl.9minecraft.net/index.php?act=dl&id=1379429782

For 1.5.2

http://www.dl.9minecraft.net/index.php?act=dl&id=1379429763

The post Kitchens Mod [1.6.4/1.6.2/1.5.2] appeared first on Minecraft Mods, Resource Packs, Texture Packs, Skins and more.

BiblioCraft Mod [1.6.4/1.6.2/1.5.2]

$
0
0

http://www.img2.9minecraft.net/Mod/BiblioCraft-Mod.jpg

What is BiblioCraft Mod?

BiblioCraft is a fairly simple mod that adds 8 new types of unique storage blocks to display a few different items. There is a bookcase that shows up to 16 books on the shelf, an Armor stand to display a full set of armor. There is also a potion shelf for up to 12 potions, a tool rack to hang 4 different tools/weapons, a general shelf that can display any 4 items, a display case for a single fancy item, and a wooden label that can display up to 3 items in small scale for tasks such as indicating what is in a chest. The newest edition includes the wooden Desk that can hold up to 9 books.

BiblioCraft Mod Screenshots:

BiblioCraft Mod

BiblioCraft Mod

BiblioCraft Mod

BiblioCraft Mod

BiblioCraft Mod

BiblioCraft Mod

BiblioCraft Mod

http://www.img.9minecraft.net/Mod/BiblioCraft-Mod-1.jpg

http://www.img.9minecraft.net/Mod/BiblioCraft-Mod-2.jpg

http://www.img.9minecraft.net/Mod/BiblioCraft-Mod-3.jpg

http://www.img.9minecraft.net/Mod/BiblioCraft-Mod-4.jpg

http://www.img.9minecraft.net/Mod/BiblioCraft-Mod-5.jpg

http://www.img.9minecraft.net/Mod/BiblioCraft-Mod-6.jpg

http://www.img.9minecraft.net/Mod/BiblioCraft-Mod-7.jpg

http://www.img.9minecraft.net/Mod/BiblioCraft-Mod-8.jpg

http://www.img.9minecraft.net/Mod/BiblioCraft-Mod-9.jpg

http://www.img.9minecraft.net/Mod/BiblioCraft-Mod-10.jpg

http://www.img.9minecraft.net/Mod/BiblioCraft-Mod-11.jpg

http://www.img.9minecraft.net/Mod/BiblioCraft-Mod-12.jpg

BiblioCraft Mod Video:

BiblioCraft Mod Recipes:

[[Visit blog to check out this spoiler]]

How to install BiblioCraft Mod for Minecraft:

  • Download and install Minecraft Forge installer
  • Download BiblioCraft Mod zip file
  • Put BiblioCraft Mod zip file into your /.minecraft/mods folder. Do not unzip it.
  • Done

Changelogs:

v1.5.3

  • Fixed another crash with the armor stand and some of the 3D armors such as the harness from Thaumcraft and the newer 3D armor in Twilight Forest.
  • Fixed the zombie head on the armor stand.
  • Fixed a rotation bug with the Dinner Plate that caused it to be placed facing the opposite direction (noticeable with certain foods).

BiblioCraft Mod Download Links:

For 1.6.4

http://www.dl4.9minecraft.net/index.php?act=dl&id=1380026500

http://www.dl5.9minecraft.net/index.php?act=dl&id=1380052418

http://www.dl2.9minecraft.net/index.php?act=dl&id=1380051215

For 1.6.2

http://www.dl4.9minecraft.net/index.php?act=dl&id=1373418176

http://www.dl3.9minecraft.net/index.php?act=dl&id=1373418447

http://www.dl2.9minecraft.net/index.php?act=dl&id=1377986148

For 1.5.2

http://www.dl4.9minecraft.net/index.php?act=dl&id=1367628327

http://www.dl5.9minecraft.net/index.php?act=dl&id=1367653868

http://www.dl2.9minecraft.net/index.php?act=dl&id=1367653151

Older versions:

[[Visit blog to check out this spoiler]]

The post BiblioCraft Mod [1.6.4/1.6.2/1.5.2] appeared first on Minecraft Mods, Resource Packs, Texture Packs, Skins and more.


Pixelmon Mod [1.6.4/1.6.2/1.5.2]

$
0
0

http://www.img2.9minecraft.net/Pixelmon.jpg

What is Pixelmon?

Are you a follower of the famous cartoon Pokemon? This mod is for you. It adds many awesome pokemon into Minecraft.

Pixelmon Mod Features:

  • 204 pokemon!
  • Modifies NO base files (Meaning it should work with any mod)
  • Configuration file to change spawning amounts, Block and item ID’s
  • Comprehensive attack system featuring over 500 attacks (including status effects and stats modifiers)
  • Pokemon overlay showing current pokemon and their status
  • Functioning pokedex
  • Multiplayer supported! (including bukkit using bukkitforge)
  • Full PC storage system!
  • New Healing block!
  • Evolution stones!
  • New Capturing system!
  • Brand new models for pc and healer
  • 3D pokeball and capture animation (now improved)
  • All Mob’s to scale as specified by the bulbapedia
  • Battleable Trainers
  • Aggression system
  • Friendship System (Umbreon will evolve with it)!
  • Hammer and anvil crafting system for pokeballs!
  • Pokeballs now work in battle!
  • Apricorn trees
  • More Pokeballs: Heavy Ball, Level Ball, Love Ball, Moon Ball and Friend Ball + More!
  • New GUI’s for battling, summary screen, and inventory, and more!
  • Fossil Machine for reviving fossils found around the world!
  • Trading! Trade pokemon with your friends! Evolve Pokemon!
  • Find Icy and Mossy stones throughout the world to evolve certain Pokemon!
  • and much, much more….!

Pixelmon Mod Screenshots:

http://www.img.9minecraft.net/Mod1/Pixelmon-Mod-1.jpg

http://www.img.9minecraft.net/Mod1/Pixelmon-Mod-2.jpg

http://www.img.9minecraft.net/Mod1/Pixelmon-Mod-3.jpg

The Pokedex

http://www.img.9minecraft.net/Mod1/Pixelmon-Mod-4.jpg

A group council of the plains dwellers gather

http://www.img.9minecraft.net/Mod1/Pixelmon-Mod-5.jpg

http://www.img.9minecraft.net/Mods/Pixelmon-Mod-7.jpg

http://www.img.9minecraft.net/Mods/Pixelmon-Mod-8.jpg

http://www.img.9minecraft.net/Mods/Pixelmon-Mod-9.jpg

http://www.img.9minecraft.net/Mods/Pixelmon-Mod-10.jpg

http://www.img.9minecraft.net/Mod1/Pixelmon-Mod-7.jpg

GUI Shot

http://www.img.9minecraft.net/Mod1/Pixelmon-Mod-6.jpg

Pixelmon Mod Video:

Pixelmon Mod Recipes:

How to install Pixelmon Mod for Minecraft:

  • Download and install Minecraft Forge
  • Download the mod
  • Put downloaded zip file into C:\Users\YOURUSERNAME\AppData\Roaming\.minecraft\mods folder. Do not unzip it. If you don’t have a mods folder, create one
  • Enjoy the mod

Changelogs:

v2.5.4

  • Hotfix

Pixelmon Mod Download Links:

For 1.6.4

http://www.mediafire.com/download/h2bjzra2lcyu42f/Pixelmon+2.5.4.zip

http://www.filefactory.com/file/75ovjbl4joav/Pixelmon%202.5.4.zip

https://mega.co.nz/#!ChgFCQJI!L5x-z24HqNatklCSf_4kfFy9PA1_rc6G2NLJh1cqIeg

For 1.6.2

http://www.mediafire.com/download/hl1xbq3yja9odjb/Pixelmon+2.3+install.zip

https://mega.co.nz/#!WItjlRDR!JO_vzTtYhXgIEYczn0lk_D9qDcEc_3giHRnVk6BzTjU

For 1.5.2

http://www.mediafire.com/download/7848c1yj8bj583e/Pixelmon_2.2_Install.zip

https://mega.co.nz/#!n5AxTCTZ!ZnQcl0TFGf6pLBNJg9BplRAZ2zo7UTX_kvOwssrf79c

https://www.box.com/s/vj8jaj024hxhyx4g31b1

Older versions:

[[Visit blog to check out this spoiler]]

The post Pixelmon Mod [1.6.4/1.6.2/1.5.2] appeared first on Minecraft Mods, Resource Packs, Texture Packs, Skins and more.

OceanCraft Mod [1.6.4/1.6.2/1.5.2]

$
0
0

http://www.img2.9minecraft.net/Mods/OceanCraft-Mod.jpg

What OceanCraft mod does?

This mod adds a lot of more Mobs, Block’s, Items and even beautiful world generatons like Shell’s SeaWeeds or PillarHouses! You can even catch the Creatures with your FishingNet and put them in your aquarium, You can Defeat the Cannibals or dive to oysters!

Mobs

[[Visit blog to check out this spoiler]]

Block’s

[[Visit blog to check out this spoiler]]

Items & Armor

[[Visit blog to check out this spoiler]]

World Generations

[[Visit blog to check out this spoiler]]

Mod Showcase

Crafting & Melting Recipes

[[Visit blog to check out this spoiler]]

How to install OceanCraft Mod:

  • Download and install Minecraft Forge
  • Download mod zip file
  • Put downloaded zip file into C:\Users\YOURUSERNAME\AppData\Roaming\.minecraft\mods folder. Do not unzip it. If you don’t have a mods folder, create one
  • Done

OceanCraft Mod Download Links:

For 1.6.4

http://www.dl3.9minecraft.net/index.php?act=dl&id=1386022011

http://www.dl4.9minecraft.net/index.php?act=dl&id=1385996219

For 1.6.2

http://www.dl2.9minecraft.net/index.php?act=dl&id=1381478357

http://www.dl.9minecraft.net/index.php?act=dl&id=1381502974

For 1.5.2

http://www.dl.9minecraft.net/index.php?act=dl&id=1372069233

http://www.dl4.9minecraft.net/index.php?act=dl&id=1372044058

http://www.dl5.9minecraft.net/index.php?act=dl&id=1372069744

The post OceanCraft Mod [1.6.4/1.6.2/1.5.2] appeared first on Minecraft Mods, Resource Packs, Texture Packs, Skins and more.

SimCraft Mod [1.6.4/1.6.2/1.5.2]

$
0
0

http://www.img.9minecraft.net/Mods/SimCraft-Mod.jpg

What is SimCraft mod?

A Mod design with creativity and realism in mind providing you with a complete new game dynamic and loads of extra building options. The mod is primarily based on HD textures lower resolutions however will be available later and it’s currently a work in progress, the lowest currently is 64bit. The concept of SimCraft is to enhance your building and mining experience and to allow you to extend your game with endless possibilities, we are really set out to keep game balance in tact and provide you with a very authentic feeling when playing with SimCraft

For those concerned about using 64bit texture, don’t be the textures really fit in nicely with the default vanilla textures, and you don’t really see a major drop in fps. This mod is huge in fact it’s the biggest mod available to date.

Screenshots:

[[Visit blog to check out this spoiler]]

Video:

How to install SimCraft Mod for Minecraft:

  • Download and intsall Minecraft Forge
  • Download the mod
  • Drag and drop the downloaded jar file into the C:\Users\YOURUSERNAME\AppData\Roaming\.minecraft\mods folder. If one does not exist you can create one
  • Enjoy

Mod Download Links:

For 1.6.4

http://www.dl3.9minecraft.net/index.php?act=dl&id=1386079035

http://www.dl4.9minecraft.net/index.php?act=dl&id=1386053251

For 1.6.2

https://mega.co.nz/#!HUoVgIga!BKAtQlYZWZrrYaOuN0Xol0_8mu8eWtCPoGgMth0qW7U

http://www.files.9minecraft.net/index.php?act=dl&id=1379576627

For 1.5.2

http://www.dl2.9minecraft.net/index.php?act=dl&id=1374741027

http://www.simcraft.co.za/server/152Standard/SimCraftClientv1.5.jar

The post SimCraft Mod [1.6.4/1.6.2/1.5.2] appeared first on Minecraft Mods, Resource Packs, Texture Packs, Skins and more.

[API] LiteLoader [1.7.2/1.6.4/1.6.2/1.5.2]

$
0
0

http://www.img.9minecraft.net/Mod/LiteLoader.jpg

What is LiteLoader?

LiteLoader is a lightweight mod bootstrap designed to provide very basic loader functionality for mods which don’t need to modify game mechanics. It is designed to run alongside ModLoader and Minecraft Forge and LiteLoader mods will not conflict with ModLoader or Forge mods.

http://www.img.9minecraft.net/Mod/LiteLoader-1.png

LiteLoader is aimed squarely at mods which only change the client in some way; some good examples might be a mini-map, a mod which overhauls the in-game chat or a client-side macro system. This type of mod doesn’t generally need the awesome power of something like Minecraft Forge to function, so asking players to install an API that’s several times larger than the mod itself doesn’t make sense. It must however coexist peacefully alongside Forge (so that players can use both platforms if they want to!) and LiteLoader does this.

LiteLoader was primarily developed for use by The VoxelModPack Team but is open source to allow mod developers to make their own mods using the platform.

As a modder, if you’re looking for a loader to help you add a new block, item, mob or mechanic into the game, then LiteLoader isn’t for you and you should check out Minecraft Forge. If you want to make a mod that displays something on the screen like a heads-up FPS counter, provides an in-game IRC window, or anything else that doesn’t alter game mechanics then LiteLoader is probably perfect for you!

http://www.img.9minecraft.net/Mod/LiteLoader-2.png

As you’ve probably noticed, Minecraft 1.6 sees the introduction of a new Launcher from Mojang which is considerably more advanced than the old one. Amongst the improvements was the ability for an installed mod to inject itself into the game at load time as a Tweak. A Tweak basically gets free rein over the game startup process and can inject any code it likes into the game. LiteLoader uses this tweak functionality to load itself, and in turn load any mods that you have installed. This is great because it allows loaders to run without touching the minecraft jar at all!

However there’s a problem: the new launcher only allows one Tweak at a time to be specified, so if you want to run multiple Tweak classes at the same time, such as LiteLoader and Forge Mod Loader (FML), then you have a problem. How do we fix this?

The answer is with cascadedTweaks. This is a special command-line option sent to the game which the LiteLoader tweaker will recognise and will try to load the other Tweaks thus specified. In a nutshell, Minecraft loads the LiteLoader Tweak, and then the LiteLoader Tweak loads the other Tweaks! Simple!

The LiteLoader installer supports creating cascadedTweaks for well-known Tweaks such as FML, or you can add your own by editing the JSON file. I will add more Tweaks to the installer as they become available. If you know of an unsupported Tweak then let me know. To specify cascadedTweaks just check the relevant checkbox when installing LiteLoader.

Note that you still need to install the relevant other mod. For example to cascade to FML you must install FML or Minecraft Forge from their own installer first!

How to install LiteLoader for Minecraft:

  • Download the latest version of the LiteLoader installer for Windows (exe) or all other platforms (jar), or choose the version for your version of Minecraft.
  • Close the Minecraft launcher if it is running
  • Run the installer, if your minecraft installation is not automatically detected then select your .minecraft folder by clicking “…”
  • If you wish to extract the loader jar, choose extract
  • Select any cascadedTweaks you wish to apply to the profile (hint: to change these at a later date simply run the installer again) such as cascading to Minecraft Forge.
  • Click OK to create the profile
  • A message should indicate that the installation was successful
  • Start the minecraft launcher and choose the “LiteLoader” profile.

LiteLoader Download Links:

For 1.7.2

For Windows (Exe): Download from Server 1Download from Server 2Download from Server 3

For All Other Platforms (Jar): Download from Server 1Download from Server 2Download from Server 3

For 1.6.4

For Windows (Exe): Download from Server 1Download from Server 2Download from Server 3

For All Other Platforms (Jar): Download from Server 1Download from Server 2Download from Server 3

For 1.6.2

For Windows (Exe): Download from Server 1Download from Server 2Download from Server 3

For All Other Platforms (Jar): Download from Server 1Download from Server 2Download from Server 3

For 1.5.2

http://www.dl.9minecraft.net/index.php?act=dl&id=1374054403

The post [API] LiteLoader [1.7.2/1.6.4/1.6.2/1.5.2] appeared first on Minecraft Mods, Resource Packs, Texture Packs, Skins and more.

OpenBlocks Mod [1.6.4/1.6.2/1.5.2]

$
0
0

http://www.img2.9minecraft.net/Mod/OpenBlocks-Mod.jpg

What is OpenBlocks?

A fun mod with a lot of different and interesting toys!

OpenBlocks is a new open source mod that introduces a variety of ideas into Minecraft, including hang gliders, elevators, awesome multiblock tanks, graves, paints, cranes, liquid XP, cartographers, trophies and more!

Mod Spotlight

How to install OpenBlocks Mod:

  • Download and install Minecraft Forge
  • Download the mod
  • Drag and drop the downloaded jar file into the C:\Users\YOURUSERNAME\AppData\Roaming\.minecraft\mods folder. If one does not exist you can create one
  • Enjoy the mod

OpenBlocks Mod Download Links:

For 1.6.x

http://www.dl.9minecraft.net/index.php?act=dl&id=1386014366

http://www.dl4.9minecraft.net/index.php?act=dl&id=1386038919

For 1.5.2

http://www.dl.9minecraft.net/index.php?act=dl&id=1386014351

The post OpenBlocks Mod [1.6.4/1.6.2/1.5.2] appeared first on Minecraft Mods, Resource Packs, Texture Packs, Skins and more.

WorldEdit CUI Mod [1.7.2/1.6.4/1.6.2/1.5.2]

$
0
0

http://www.img2.9minecraft.net/Mod/WorldEdit-CUI-Mod.jpg

What WorldEdit CUI mod does?

This mod provides a client-side user interface for the WorldEdit plugin allowing you to see your selected region in-game in real time. It allows you to work more quickly and accurately with your WorldEdit selection and is especially useful when working with Polygon, Convex Hull and Cylinder selections.

WorldEditCUI was originally written by lahwran, it was subsequently maintained by yetanotherx.

Features:

  • Display your WorldEdit selection instantly in-game
  • Feel good about yourself
  • Doesn’t cause global warming

Screenshots:

http://www.img2.9minecraft.net/Mod/WorldEdit-CUI-Mod-1.jpg

http://www.img2.9minecraft.net/Mod/WorldEdit-CUI-Mod-2.jpg

http://www.img2.9minecraft.net/Mod/WorldEdit-CUI-Mod-3.jpg

How to use the mod:

  • To use WorldEditCUI, simply make a selection on a server using WorldEdit, your selection will be instantly displayed on the screen. To clear your current selection issue the command //sel

How to install WorldEdit CUI Mod:

  • Download and install [API] LiteLoader
  • Download the mod
  • Copy it to your mods folder.
  • Note: Some browsers will change the file extension to .zip when downloading, if this happens be sure to change it back to .litemod or LiteLoader will not find the mod!
  • Run the game and bask in the warm glow of your new CUI mod.

Download Links:

For 1.7.2

http://www.dl4.9minecraft.net/index.php?act=dl&id=1386043809

http://www.dl.9minecraft.net/index.php?act=dl&id=1386019256

For 1.6.4

http://www.dl.9minecraft.net/index.php?act=dl&id=1386019245

For 1.6.2

http://www.dl.9minecraft.net/index.php?act=dl&id=1386019233

For 1.5.2

http://www.dl.9minecraft.net/index.php?act=dl&id=1386019219

The post WorldEdit CUI Mod [1.7.2/1.6.4/1.6.2/1.5.2] appeared first on Minecraft Mods, Resource Packs, Texture Packs, Skins and more.

Monster Hunter Frontier Mod [1.6.4/1.6.2]

$
0
0

http://www.img.9minecraft.net/Mod/Monster-Hunter-Frontier-Mod.jpg

What does Monster Hunter Frontier adds?

This a mod that adds a new dimension with some new blocks,items , weapons , ores, armors and most of all mobs that has different variations of attacks and uniqueness. This mod is inspired from a popular game of Capcom Monster Hunter Frontier. This can be played through Singleplayer and also Multiplayer.

Features:

In The Wyvernia there is a typically resistance on everyone it is far different than the Minecraft.

The Sword Damage Type :

  • Lethal : This are the main swords made with sharpness specifically LongSwords,Dual Swords and The Vanilla Swords .
  • Semi – Lethal : Weapons like GreatSword and Lance are bound to this class . They are sharp but not high as the Lethal. Since they are heavy they give a little fatigue to player
  • Siege : They are Hunting Horns and Hammer , and soon to be with Switch Axe , they are stun pounding and they give really deep exhaustion to player on attack . But deals massive damage.
  • Point : This is the upcoming ones for the types of Bowgun , Bows , and some Gunlance ,

Elements:

  • As of Now There are 3 elements in the game the Poison , Lightning and Normal . They due specific motion

Screenshots:

Monster Hunter Frontier Mod

Monster Hunter Frontier Mod

Monster Hunter Frontier Mod

Monster Hunter Frontier Mod

Monster Hunter Frontier Mod

Monster Hunter Frontier Mod

Monster Hunter Frontier Mod

Monster Hunter Frontier Mod

Monster Hunter Frontier Mod

Monster Hunter Frontier Mod

Monster Hunter Frontier Mod

A gang banged Apceros

Monster Hunter Frontier Mod

Monster Hunter Frontier Mod

Monster Hunter Frontier Mod

Dimension:

First you will need the bread and the butter :3Firestone

Monster Hunter Frontier Mod

This will help you light your dimension. Nothing Special on this.

Next is The Block DesignNow this one is a little complicated bu tworth.

Monster Hunter Frontier Mod

Youll need a sparked Dust to craft this

Monster Hunter Frontier Mod

To get Sparked Dust you need a burned Ingot to smelt

Monster Hunter Frontier Mod

which can be get when smelt an iron ingot =OFor the structure is just a simple nether like structureso it must look like this

Monster Hunter Frontier Mod

Mod Spotlight:

How to install Monster Hunter Frontier Mod for Minecraft:

  • Download and install Minecraft Forge
  • Download mod zip file
  • Put downloaded zip file into your /.minecraft/mods folder. Do not unzip it. If you don’t have a mods folder, create one
  • Done

Mod Download Links:

For 1.6.4

http://www.files.9minecraft.net/index.php?act=dl&id=1379858612

https://mega.co.nz/#!uhgwEYrZ!ZDwkdD72_BvEfb_UNXEpzSLga2wLHyVRqQc-gn0rruc

For 1.6.2

http://www.files.9minecraft.net/index.php?act=dl&id=1379390242

https://mega.co.nz/#!udZxyKpD!LoToUFDBJLTQxuGVybyTsl7ZJ4dmHee2ltXjp516owE

The post Monster Hunter Frontier Mod [1.6.4/1.6.2] appeared first on Minecraft Mods, Resource Packs, Texture Packs, Skins and more.


Ice Cream Mod [1.6.4/1.6.2/1.5.2]

$
0
0

http://www.img.9minecraft.net/Mod/Ice-Cream-Mod.jpg

What Ice Cream mod does?

This mod make your own Ice cream

The mod:

The Ice cream mod is about ice. (I think thats logic, isn’t it?) And in the next spoilers I gonna tell you everything about this mod, including the new/old stuff! Let’s start with the Plants:

Plants

[[Visit blog to check out this spoiler]]

Items

[[Visit blog to check out this spoiler]]

Video:

Recipes:

http://www.img.9minecraft.net/Mod/Ice-Cream-Mod-Recipes-1.jpg

http://www.img.9minecraft.net/Mod/Ice-Cream-Mod-Recipes-2.jpg

The new Wither ice cream effects!

http://www.img.9minecraft.net/Mod/Ice-Cream-Mod-Recipes-3.jpg

How to install Ice Cream Mod:

  • Download and install Minecraft Forge
  • Download Ice Cream Mod
  • Unzip file
  • Put all files into your .minecraft.jar
  • Done

Changelogs:

Mod Download Links:

For 1.6.4

http://www.dl.9minecraft.net/index.php?act=dl&id=1386201201

http://www.dl4.9minecraft.net/index.php?act=dl&id=1386225742

For 1.6.2

http://www.dl2.9minecraft.net/index.php?act=dl&id=1374953016

http://www.dl.9minecraft.net/index.php?act=dl&id=1374953472

For 1.5.2

http://www.dl.9minecraft.net/index.php?act=dl&id=1374953447

Older versions:

[[Visit blog to check out this spoiler]]

The post Ice Cream Mod [1.6.4/1.6.2/1.5.2] appeared first on Minecraft Mods, Resource Packs, Texture Packs, Skins and more.

Custom Mob Spawner Mod [1.6.4/1.6.2/1.5.2]

$
0
0

http://www.img.9minecraft.net/Mod/Custom-Mob-Spawner-Mod.jpg

About Custom Mob Spawner:

The animals no longer despawn and their spawn is based on the biome seed. In other words, the randomness of spawning was removed. There are several mods that relied on the prior mob spawning method to add custom mobs to the game, like Mo’Creatures, More Creeps and Weirdos, Humans+ and many more.

How to install Custom Mob Spawner Mod:

  • Just download the .zip file and put it into the /.minecraf/mods/ folder

Changelogs:

v2.3.2 Dev R1

Custom Mob Spawner Mod Download Links:

For 1.6.4

http://www.dl.9minecraft.net/index.php?act=dl&id=1386201581

For 1.6.2

http://www.dl2.9minecraft.net/index.php?act=dl&id=1376952502

http://www.dl3.9minecraft.net/index.php?act=dl&id=1376928048

For 1.5.2

http://www.dl.9minecraft.net/index.php?act=dl&id=1368599912

http://www.dl4.9minecraft.net/index.php?act=dl&id=1368574741

Older versions:

[[Visit blog to check out this spoiler]]

The post Custom Mob Spawner Mod [1.6.4/1.6.2/1.5.2] appeared first on Minecraft Mods, Resource Packs, Texture Packs, Skins and more.

Mo’Creatures Mod [1.6.4/1.6.2/1.5.2]

$
0
0

http://www.img.9minecraft.net/Mods/Mo-Creatures-Mod.jpg

What does Mo’Creatures Mod adds?

Mo’Creatures Mod adds more creatures to the game. This is one of the best additions one can add to minecraft, this mod adds a ton of mobs/animals.

Mo’Creatures Mod Videos:

[[Visit blog to check out this spoiler]]

More Videos:

[[Visit blog to check out this spoiler]]

Currently the Mod adds the following creatures:

Mini Golems

[[Visit blog to check out this spoiler]]

Silver Skeletons

[[Visit blog to check out this spoiler]]

Raccoons

[[Visit blog to check out this spoiler]]

Small and Medium Fish

[[Visit blog to check out this spoiler]]

Crabs

[[Visit blog to check out this spoiler]]

Wyverns

[[Visit blog to check out this spoiler]]

Elephants and Mammoths

[[Visit blog to check out this spoiler]]

Komodo Dragons

[[Visit blog to check out this spoiler]]

Golems

[[Visit blog to check out this spoiler]]

Snails

[[Visit blog to check out this spoiler]]

Insects

[[Visit blog to check out this spoiler]]

Turkeys

[[Visit blog to check out this spoiler]]

Horses

[[Visit blog to check out this spoiler]]

Ostriches

[[Visit blog to check out this spoiler]]

Snakes

[[Visit blog to check out this spoiler]]

MantaRays

[[Visit blog to check out this spoiler]]

Stingrays

[[Visit blog to check out this spoiler]]

JellyFish.

[[Visit blog to check out this spoiler]]

Added Goats

[[Visit blog to check out this spoiler]]

Crocodiles

[[Visit blog to check out this spoiler]]

Turtles

[[Visit blog to check out this spoiler]]

Scorpions

[[Visit blog to check out this spoiler]]

Kitties

[[Visit blog to check out this spoiler]]

Mice

[[Visit blog to check out this spoiler]]

Rats

[[Visit blog to check out this spoiler]]

Deer

[[Visit blog to check out this spoiler]]

BigCats™

[[Visit blog to check out this spoiler]]

Lil’ Fish (including piranhas)

[[Visit blog to check out this spoiler]]

Dolphins

[[Visit blog to check out this spoiler]]

Sharks

[[Visit blog to check out this spoiler]]

Werewolves

[[Visit blog to check out this spoiler]]

Bears

[[Visit blog to check out this spoiler]]

Wolves

[[Visit blog to check out this spoiler]]

Wraith

[[Visit blog to check out this spoiler]]

Flame Wraith

[[Visit blog to check out this spoiler]]

Ogre

[[Visit blog to check out this spoiler]]

Fire Ogre

[[Visit blog to check out this spoiler]]

Cave Ogre

[[Visit blog to check out this spoiler]]

Ducks

[[Visit blog to check out this spoiler]]

Boars

[[Visit blog to check out this spoiler]]

Bunnies

[[Visit blog to check out this spoiler]]

Birds!

[[Visit blog to check out this spoiler]]

Foxes

[[Visit blog to check out this spoiler]]

How to install Mo’Creatures Mod for Minecraft:

Please make a backup of your minecraft.jar file and then:

  • 1. Install Minecraft Forge installer
  • 2. Install GUI API (you have to unzip the .zip file and add all of its contents to your minecraf.jar file)
  • 3. Download and install Custom Mob Spawner Mod
  • 4. Locate your .minecraft/mods folder
  • 5. Copy the MoCreatures.zip file inside your \.minecraft/mods folder
  • 6. Play

Notes: Before updating to MoCreatures v6.0.1, make sure you ran Mo’Creatures 5.2.5 first and store your tamed pets on the new PetAmulets, otherwise they will be lost!

Changelogs:

v6.0.2

v6.0.1

Mod Download Links:

For 1.6.4 (Dev version – Use At Your Own Risk)

http://www.mediafire.com/download/ebjf5z4b4tthy87/DrZharks+MoCreatures+Mod+v6.0.2-DEVR1.zip

https://mega.co.nz/#!jJh3nJpT!FpQJXkATqdaKw0yDupcu8WogNPYkpjlY19iTCYOv_gw

For 1.6.2

http://www.files.9minecraft.net/index.php?act=dl&id=1378264695

http://www.mediafire.com/?0majv0cc2hsaecq

https://mega.co.nz/#!yFR3wTiB!HF9STk5nfromUKD6rPCpTWwrFrUxprWyWkHyOPRTlWI

For 1.5.2

http://www.files.9minecraft.net/index.php?act=dl&id=1378264691

http://www.mediafire.com/?xwysvfr5k98cww0

https://mega.co.nz/#!iMJDmTCa!Ir7Ajgb9f9dYonZ5EmWw5BzXSKksw9IzTJ5kTyqBaEo

Older versions:

[[Visit blog to check out this spoiler]]

The post Mo’Creatures Mod [1.6.4/1.6.2/1.5.2] appeared first on Minecraft Mods, Resource Packs, Texture Packs, Skins and more.

Smart Moving Mod [1.6.4/1.6.2/1.5.2]

$
0
0

http://www.img.9minecraft.net/Mod/Smart-Moving-Mod.jpg

What is Smart Moving Mod?

Smart Moving Mod adds many animations and new functions, giving two controls that you need to key bind, the sprinting key and the grab key. This mod is very intuitive with it’s controls allowing for a lot of new functions that allow you to navigate the terrain much faster, smoother and overall much more effectively

Smart Moving Mod Features:

[[Visit blog to check out this spoiler]]

Configurability:

This mod changes the behaviour of its features depending on the content of the configuration file “smart_moving_options.txt” in the “.minecraft” directory of your minecraft installation.

Currently the difficulty levels “Easy”, “Medium” and “Hard” are configured. You can switch between those in-game by pressing F9 (the exact button can be changed too)

More information about the configuration of this mod is included in its readme and option files.

Previous option files like “smart_climbing_options.txt” and “smart_ladder_climbing_speed_options.txt” are still accepted but their content is eventually overridden by the content of existing more actual option files.

If no option files are present at all, the default option values (all features, default configuration) will be used.

If an option is not present in the files, the corresponding default value will be used.

The option “move.options.version” will be used for cross version compatibility.

Mod Spotlight:

Requirements:

How to install Smart Moving Mod for Minecraft:

  • Installation varies depending on your minecraft installation.
  • So choose your package and install it – do NOT install more than one package.

In any case, NEVER forget: ALWAYS back up your stuff!

Standalone for Client:

Your minecraft installation does not use any mod management system.

You don’t care about other mods, you just want to smart move while playing Minecraft.

  • Copy all files inside one of the included “Standalone” zip packages to their corresponding locations in your “Minecraft.jar” in your “/.minecraft/bin/”.
  • Do not forget to delete the “META-INF” directory while you are at it.
  • Choosing the package depends on the other mods you want to be installed in your “Minecraft.jar”.
  • The client standalone package “Smart Moving Client Standalone Minecraft-asv-atc-gu-gz.zip” overwrites the files “net/minecraft/client/Minecraft.class”, “asv”, “atc.class” “gu”.class and gz.class.
  • The client standalone package “Smart Moving Client Standalone anz-asv-auq-gu-gz.zip” overwrites the files “anz.class”, “asv”, “auq.class”, gu.class and gz.class.
  • Each package should not be combined with other mods that overwrite any of its corresponding files.

Smart Moving Mod Download Links:

For 1.6.4

Download from Server 1Download from Server 2Download from Server 3

For 1.6.2

Download from Server 1Download from Server 2Download from Server 3

For 1.5.2

Download from Server 1Download from Server 2Download from Server 3Download from Server 4

Older versions:

[[Visit blog to check out this spoiler]]

The post Smart Moving Mod [1.6.4/1.6.2/1.5.2] appeared first on Minecraft Mods, Resource Packs, Texture Packs, Skins and more.

Antique Atlas Mod [1.6.4/1.6.2/1.5.2]

$
0
0

http://www.img2.9minecraft.net/Mod/Antique-Atlas-Mod.jpg

What does Antique Atlas mod do?

Adds item Antique Atlas. It’s like a fancy antique-looking map, which saves all visited locations so you can browse them. Maps are generated around the player based on chunk-average biome.

Since version 2.0 you can navigate the map by pressing arrow buttons or arrow keys on the keyboard. Press the button in the bottom right corner to return to you current location.

Mod Screenshots:

http://www.img2.9minecraft.net/Mod/Antique-Atlas-Mod-1.jpg

http://www.img2.9minecraft.net/Mod/Antique-Atlas-Mod-2.jpg

Mod Spotlights:

Recipes:

Antique Atlas Mod + Antique Atlas Mod = Antique Atlas Mod
Antique Atlas Mod + RMB = Antique Atlas Mod

How to install Antique Atlas Mod:

  • Download and install Minecraft Forge
  • Download the mod
  • Put downloaded zip file into C:\Users\YOURUSERNAME\AppData\Roaming\.minecraft\mods folder. Do not unzip it. If you don’t have a mods folder, create one
  • Enjoy the mod

Mod Download Links:

For 1.6.x

http://www.dl3.9minecraft.net/index.php?act=dl&id=1386343375

http://www.dl.9minecraft.net/index.php?act=dl&id=1386293028

For 1.5.2

http://www.dl.9minecraft.net/index.php?act=dl&id=1386293014

The post Antique Atlas Mod [1.6.4/1.6.2/1.5.2] appeared first on Minecraft Mods, Resource Packs, Texture Packs, Skins and more.

Viewing all 2832 articles
Browse latest View live


<script src="https://jsc.adskeeper.com/r/s/rssing.com.1596347.js" async> </script>